



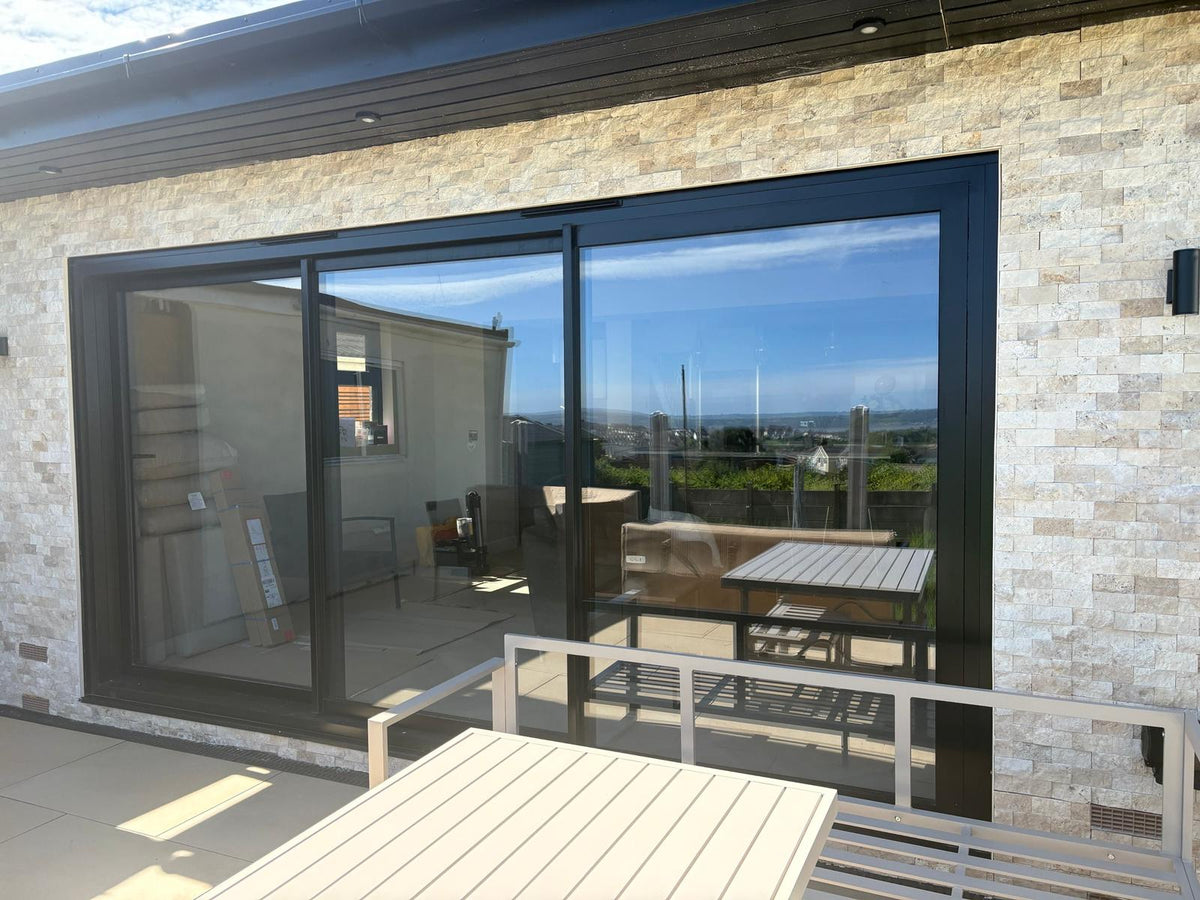
What Is Split Face Cladding? A Guide to Natural Stone Wall Cladding
Split face cladding is a natural stone wall covering designed to create a textured, three-dimensional stone finish. Individual pieces of natural stone are arranged at slightly different depths, producing the varied surface and shadow lines associated with traditional stone walls.
Unlike flat stone veneer sheets, split face cladding has a more pronounced texture and depth. It can be used to create feature walls, fireplace surrounds, exterior walls and other decorative surfaces in residential and commercial projects.
Is Split Face Cladding Real Stone?
Yes. Lite Stone split face cladding is made from genuine natural stone.
The natural variation in colour, texture and markings means that individual pieces will vary. These differences are part of the character of the material and help create a finished wall that looks naturally varied rather than repetitive.
When several tiles are installed together, the individual pieces combine to create the appearance of a continuous natural stone surface.
What Does Split Face Mean?
The term "split face" describes the textured surface created when natural stone is split rather than polished completely smooth.
This exposes the natural character of the stone and creates variations in depth across the face of each piece. When illuminated from above, below or from the side, these variations can create attractive highlights and shadows across the finished wall.
The result is a much more textured appearance than a conventional flat wall tile.

How Is Split Face Cladding Supplied?
Our split face cladding pieces are approximately 30.5 x 30.5cm.
The individual pieces of natural stone are arranged together to form an interlocking tile. This makes it easier to cover larger areas while maintaining the appearance of individually laid pieces of stone.
The interlocking edges help neighbouring tiles fit together and reduce the appearance of obvious straight joints across the finished wall.
Where Can Split Face Cladding Be Used?
Split face cladding can be used for a wide range of residential and commercial applications, including:
Feature walls
Fireplace surrounds
Living rooms
Dining areas
Kitchens
Bathrooms
Exterior feature walls
Garden walls and landscaping features
Commercial interiors
The suitability of a particular stone should always be considered alongside the location and conditions of the installation.
Can Split Face Cladding Be Used Outside?
Yes. Suitable Lite Stone split face cladding can be used for exterior installations.
Unlike our slate veneer, which requires a suitable level substrate such as exterior-grade cement board, split face cladding can be installed directly onto suitable brickwork or blockwork.
The substrate must be sound, clean and suitable for supporting the stone cladding.
Our white marble split face cladding is an exception and is not recommended for exterior use.
For exterior installations, we recommend sealing the finished natural stone surface with a suitable natural stone sealer.

Can Split Face Cladding Be Used Around a Fireplace?
Yes. Split face cladding can be used around suitable fireplaces and is a popular way to create a natural stone fireplace surround or feature wall.
The texture of split face stone works particularly well around fireplaces because the variation in the surface creates natural highlights and shadows.
As with any material installed around a fireplace or other heat source, the construction of the fireplace and suitability of the installation should be considered before fixing the cladding.
Can Split Face Cladding Be Used in Kitchens and Bathrooms?
Yes. Split face cladding can be used on suitable kitchen and bathroom walls.
Because natural stone can be susceptible to moisture and staining, we recommend sealing the surface in areas exposed to water, cooking splashes or other contaminants.
A suitable natural stone sealer will help protect the surface while retaining the character of the stone.
Does Split Face Cladding Need Grouting?
No. Split face cladding is designed to create a continuous natural stone surface without conventional grout joints.
The tiles interlock with one another, helping disguise the edges between individual sections of cladding.
This means there is normally no need to leave regular grout joints between the tiles or grout the finished wall as you would with conventional ceramic or stone tiles.
Careful positioning during installation is important to maintain the natural appearance and prevent obvious repeating joint lines.
How Do You Install Split Face Cladding?
Before installation, make sure the surface is sound, clean and suitable for supporting natural stone cladding.
It is also a good idea to lay out some of the tiles before fixing them. Because natural stone varies in colour and texture, taking tiles from different boxes and arranging them before installation can help distribute this natural variation across the wall.
We recommend using a suitable strong cement-based tile adhesive supplied as a powder and mixed with water, such as Mapei or Kerakoll. Avoid ready-mixed tub adhesives.
Apply the adhesive evenly to the prepared substrate using a 6mm notched trowel. Apply a thin layer of adhesive to the back of each tile before pressing it firmly into position.
Work across the wall while checking that the tiles remain level and that the interlocking edges fit together naturally.
For complete step-by-step information, see our Split Face Cladding Installation Guide.

How Do You Cut Split Face Cladding?
Split face cladding can be cut using an angle grinder with a suitable diamond blade or a tile saw.
The individual stone pieces are attached to a mesh backing. Where necessary, the mesh can be cut with a utility knife so individual pieces can be removed or repositioned before the stone itself is cut to size.
Measure carefully before cutting and consider where cut edges will appear on the finished installation.
If you have not worked with split face stone before, practising on a spare piece or offcut before making important visible cuts can be helpful.
How Do You Finish External Corners?
One advantage of split face cladding is that external corners can be created without necessarily using conventional tile trims or beading.
Individual stone pieces can be removed or repositioned and interlocked around the corner to create a more natural-looking finish.
Taking a little extra time when arranging corners helps maintain the appearance of continuous natural stone wrapping around the wall.
Does Split Face Cladding Need Sealing?
We recommend sealing split face cladding when it is installed externally or in areas such as kitchens and bathrooms.
A suitable natural stone sealer helps protect the surface from moisture and staining.
Whether sealing is necessary in other internal areas will depend on the application and the likelihood of the stone being exposed to contaminants.
Suitable natural stone sealers are available from our online store.
How Do You Clean Split Face Cladding?
For normal dust and loose dirt, a soft-bristled brush can be used to clean the textured stone surface.
Where wet cleaning is required, use a pH-neutral cleaner suitable for natural stone. Avoid acidic or strongly alkaline cleaning products unless they are specifically suitable for the particular stone.
Abrasive cleaning tools should also be avoided where they could scratch or damage the natural surface.
The textured nature of split face stone means a soft brush can be particularly useful for reaching the variations and recesses in the surface.
Split Face Cladding vs Stone Veneer
Split face cladding and stone veneer both provide a genuine natural stone finish, but they create very different appearances.
Stone veneer is thin, lightweight and relatively flat. Its flexible construction allows it to be used on flat and some curved surfaces where keeping thickness and weight to a minimum is important.
Split face cladding is thicker and more heavily textured. Individual pieces of stone project at different depths, producing a pronounced three-dimensional surface.
For a relatively flat natural stone finish, stone veneer may be the better choice. If the aim is to create a deeper, more rugged stone wall appearance with strong texture and shadow, split face cladding may be more appropriate.

Choosing Split Face Cladding for Your Project
Start by considering the colour and character of the surrounding space and the type of finish you want to achieve.
Natural stone can vary considerably, so samples are useful for seeing the colour, texture and depth of the material in person before ordering for a larger project.
Lighting should also be considered. Because split face cladding has a three-dimensional surface, directional lighting can emphasise its texture by creating highlights and shadows across the stone.
For larger walls, natural variation between individual pieces should be expected and embraced as part of the finished appearance.
Interior and Exterior Split Face Cladding Ideas
Split face stone can be used to create a focal point rather than covering every wall in a room.
A fireplace feature wall can introduce natural texture into a living area, while a single stone wall can provide contrast against painted walls, timber, glass and other contemporary materials.
In kitchens and bathrooms, split face cladding can introduce a more tactile natural surface. Externally, suitable split face stone can be used on feature walls and landscaping projects to connect buildings and outdoor spaces with natural materials.
Our Project Gallery includes examples of split face cladding and other Lite Stone materials used in completed residential and commercial projects.
Explore Split Face Cladding
Split face cladding combines genuine natural stone with a textured, three-dimensional finish that can transform interior and suitable exterior walls.
Explore our Split Face Cladding collection to see the available natural stone finishes and order samples. For detailed fitting information, read our Split Face Cladding Installation Guide, or visit our Project Gallery to see Lite Stone materials used in completed projects.


